How to Resolve Merge Conflicts using the Command Line Interface
— Git, GitHub, dependabot, merge, cli, version control, devops — 3 min read
"I wish someone taught me before I was 30 repos deep and had GitHub dependabot sliding into my DMs three times a day."
Merge conflicts are an inevitable part of collaborative software development. It typically happens when different contributors make conflicting changes to the same codebase. While they might seem daunting at first, resolving merge conflicts via the command line is an essential skill for any developer. In this guide, we'll walk you through the process of resolving merge conflicts step by step, helping you regain the smooth flow of your development process.
Step 1: Update Your Local Repository
Before attempting to resolve a merge conflict, it's essential to make sure your local repository is up to date with the latest changes from the remote repository. Use the following commands:
git checkout maingit pull origin mainStep 2: Create a New Branch
Before you start making any changes to resolve the conflict, it's a good practice to create a new branch. This keeps the main branch clean and allows you to work on the conflict resolution without affecting ongoing development. Use the command:
git checkout -b conflict-resolutionStep 3: Merge the Conflicting Branch
Next, you'll want to merge the branch with the conflict into your current branch:
git merge <conflicting-branch>Step 4: Identify the Conflict
After attempting the merge, you'll receive a message indicating that there are conflicts. You can identify the conflicted files by using:
git statusThe conflicted files will be marked as both "modified" and "unmerged."
Step 5: Open the Conflicted Files
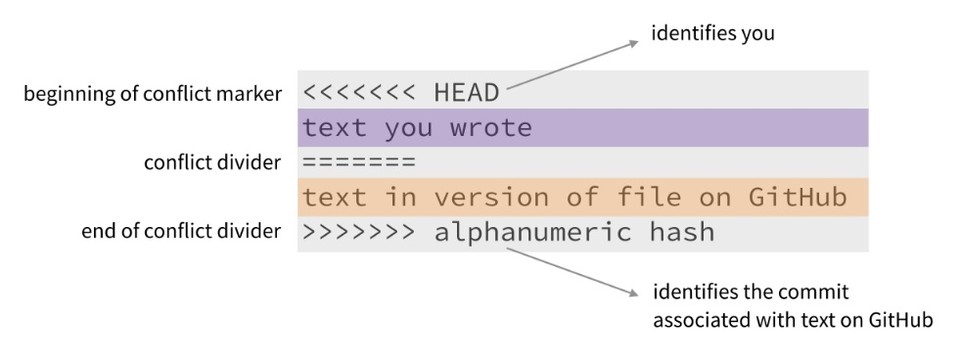
Open the conflicted files using a text editor or integrated development environment (IDE). In these files, you'll notice sections surrounded by \<\<\<\<\<\<\< ======= and \>\>\>\>\>\>\> which represent the conflicting changes from different branches.
 Step 6: Resolve the Conflict
Edit the conflicted sections to choose the appropriate code or combine changes from both branches. Remove the conflict markers (\<\<\<\<\<\<\< ======= and \>\>\>\>\>\>\>) once you're satisfied with the resolution.
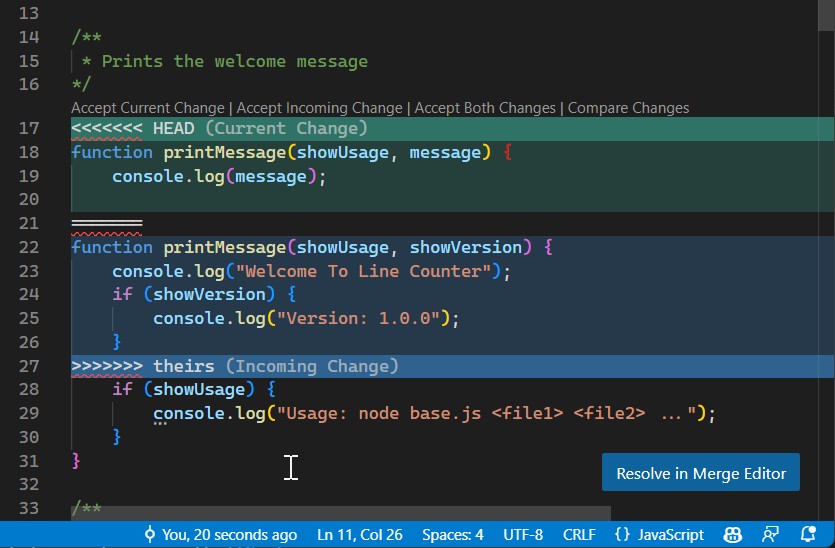 VS Code includes a Merge Editor which makes things a lot easier.
Step 7: Stage the Changes
After resolving the conflicts, you need to stage the modified files:
git add <conflicted-file-1> <conflicted-file-2> ...Step 8: Commit the Merge Resolution
With the conflicts resolved and changes staged, commit the changes:
git commit -m "Resolve merge conflict in <conflicted-file>"Step 9: Push the Changes
Finally, push the resolved merge to your remote repository:
git push origin conflict-resolutionStep 10: Create a Pull Request
If you're working in a collaborative environment, create a pull request from your conflict-resolution branch to the main branch. This allows the changes to be reviewed before merging into the main codebase.
Easy money.
Resolving merge conflicts via the command line is an essential skill for developers working on collaborative projects. By following these steps, you can confidently navigate and resolve conflicts, ensuring the seamless progress of your development process. Remember that patience and clear communication with your team members are key to successfully resolving merge conflicts and maintaining a healthy codebase.
Share this post!
Thanks for reading! Don't forget to smash that share button and subscribe.